


February 20, 2022 at 1:16 p.m.
As iPhone models increase in cost and complexity, many hope to get several years out of the device. This article explains how to make your iPhone last almost forever.
Table of Contents:
- The iPhone is Here to Stay
- Don’t Put Your iPhone in a Case
- Turn off Your iPhone When Charging
- Don’t Charge Your iPhone over 80%
- Turn on Optimized Battery Charging
- Charge Your iPhone With the Original Charger
- Calibrate Your iPhone Battery
- Replace Your iPhone Battery
- Turn on Low Power Mode
- Review Battery Usage Reports
- Turn on Airplane Mode When Possible
- Clean Your iPhone with a Microfiber Cloth
- Avoid Using Physical Buttons and Switches
- Make Sure You Have at Least 1GB of Available Storage
- Erase All Settings and Content
- Be Careful About Upgrading iOS on Older Devices
- Old iPhones are Still Useful
The iPhone is Here to Stay
Since its debut in 2007, the iPhone has taken the world by storm. It is, without question, the first true smartphone on the planet. Apple haters claim that LG beat them to market with a smartphone, however, the Prada was not that smart. I owned its predecessor, the Chocolate, which was innovative for its time. The Prada was a step closer to a smartphone, but to say that it influenced the iPhone is laughable.


The biggest influence on the iPhone is the Mac! In fact, OS X even inspired the competing mobile operating system to incorporate widgets, which were on the Mac years before any smartphone existed. Most people who believe that Apple copied from others don’t use Apple products. They have no clue as to how much the Mac and iPod influenced both the iPhone and competing smartphones.

These days, smartphones are more similar than different. Tech corporations borrow and steal ideas from each other. Some borrow more than they innovate. Others strive for the bleeding edge, trying to beat Apple to market with a deeply flawed implementation of a nascent technology. This sets Apple up to look derivative, when they usually perfect a technology that others rushed to implement poorly.
Both Touch ID and Face ID are perfect examples of this. Apple did not invent these concepts, but they perfected the technology. If one examines the details, Apple’s implementations of both technologies are vastly different from their competitors. Only sleazy, biased writers could accuse them of intellectual property theft.
The iPhone was late to the 4G LTE game because Apple waited for low energy, compact, wireless components to implement the technology. The first 4G phones used very inefficient components, causing rapid battery drainage and overheating. But they were first to market with 4G, and their fanboys ate it up! When Apple introduced LTE with components suitable for mobile computing, their critics cried foul. They’re copying! But the components aren’t the same…
After years of so-called “iPhone killers”, no smartphone has managed to put much of a dent in Apple’s business. The main threat to the iPhone is an older iPhone. It seems that more and more users are holding on to their iPhone longer. It may be that the improvements are not that compelling. The durable design and years of iOS updates make it hard for the rational consumer to buy a new iPhone.
I am not an iPhone fan. I have an iPhone and use it rarely. My Macintosh is the most capable device I own. My iPad gets a lot of use.
You will never see me camping out for the latest iPhone. I still use an iPhone 6. I just replaced the battery and plan on using it until it is no longer eligible for iOS updates. When I get a new iPhone, my iPhone 6 will find a new life in my car, as a music player. Old iPhones are also great for setting up home security systems or baby monitors. If you have to send your iPhone in for service, and old iPhone can usually be reactivated and used as a substitute.
If you’re not an impulsive Apple fan, holding on to your iPhone for years is a rational decision. Let’s take a look at how to make your iPhone last almost forever.
Don’t Put Your iPhone in a Case


Common sense would suggest that an iPhone case is a good idea. After all, if you drop your iPhone, it may protect it from damage. Unfortunately, most cases insulate the iPhone, preventing it from dissipating heat. As your iPhone heats up, components such as the battery and WiFi module can be damaged.
A few years ago, some iPhone 4S owners experienced total failure of their WiFi module. Appledystopia followed and wrote about this issue. After a few years, it became clear to me that heat was damaging the iPhone 4S WiFi module. It seemed to expand the soldered connection, breaking contact and causing it to fail. Some users put their device in the freezer, which sometimes fixed the problem temporarily. (I strongly recommend NOT putting your iPhone in the freezer.) This seemed to confirm that heat had damaged the soldering, and cold temperatures caused the components to contract and re-establish contact.
There are a few situations where you may want to use a case. If you are clumsy, by all means, put your iPhone in a case. Dropping it will do far more damage than the altered thermodynamics from using a case. If it is cold outside, a neoprene case could insulate your iPhone, allowing it to operate without shutting down. For the most part, however, using a case will shorten the life of your iPhone. Trapping in heat can damage its components. Even Apple recommends removing devices from their cases when charging.
Turn off Your iPhone When Charging
Charging your iPhone generates heat. This can be verified by using a thermometer or simply feeling the device. If you use your iPhone while it is charging, it will generate even more heat. This shortens the lifespan of your battery. It could even damage internal components, however, this is unlikely. It’s remotely possible if you live in a warm environment without air conditioning.
Turning off your iPhone while charging will minimize heat generation. It will also enable your iPhone to charge faster. If you receive important phone calls, make sure to forward calls to another phone before you shut down your iPhone.
Make sure to plug in the charging cable before you shut down your device. I like to shut down my iPhone from the Settings menu, as it lessens wear and tear on the sleep/wake button. Simply go to Settings > General and then tap Shut Down at the bottom of the screen. Complete the shut down process by sliding the on-screen switch.

One consequence of turning off your iPhone while charging is that iCloud backups won’t execute. iCloud backups only run when your iPhone is plugged in and connected to WiFi. I suggest occasionally leaving your iPhone plugged in after you turn it back on. Unless your iPhone data are very important, you can get away with doing this once in a while. Your battery will undergo less stress if the iCloud backup happens after it has been fully charged. That said, you will want to unplug your iPhone as soon as the backup is complete.
Don’t Charge Your iPhone over 80%
This tip is for the user who really wants to hang on to their iPhone a long time, without replacing the battery. I don’t follow this advice myself, as I prefer to have a fully charged battery.
As a lithium-ion battery charges, more stress is placed on the battery as it approaches 100%. This effect is well-known. The lithium-ion batteries in satellites are typically only charged to 60-70%, in order to keep them lasting a long time. After all, it’s not easy to replace batteries in outer space.
The iPhone also goes into “trickle mode” after the battery has been charged beyond 80%. This is done to minimize battery stress as charging approaches 100%. For this reason, I recommend stopping the charge before 80%, instead of 60% or 70%, as is done with satellites. That said, the less you charge your iPhone, the longer the battery will last. Again, I don’t do this myself, but if you really want your iPhone to last a long time, without replacing the battery, partial charging will help.
Needless to say, if you shut down your iPhone when it charges, you need to estimate when it reaches this level. Set a timer on another device. After a few weeks, you will probably get very good at estimating charging times.
Turn on Optimized Battery Charging
Those with newer iPhones running the latest version of iOS can opt for Optimized Battery Charging. Essentially, this postpones fully charging your iPhone until you’re just about to use it.
The technology analyzes your use patterns and predicts when you will use your iPhone, charging it to 100% before use. This intelligent charging process ensures that the battery will not stay at 100% for long. Remember, a battery charged to 100% is under stress. If it stays at 100% too long, it will shorten battery lifespan.
Here’s a real-world example of how the iPhone’s optimized charging works. Suppose you go to bed at 11 pm and wake up at 6 am. If you plug in your iPhone before bed, optimized charging will start until it reaches a certain point. Then it stops charging until just before 6 am. Your iPhone is fully charged when you wake up, but it wasn’t stuck at 100% all night. This should improve battery lifespan dramatically.
You can turn on Optimized Battery Charging by tapping on Settings > Battery > Battery Health, then switch on Optimized Battery Charging.

For those concerned about topping off to 100% before a long day, rest assured, Apple has you covered. Whenever you turn off Optimized Battery Charging, iOS presents the option to activate the feature automatically the next day.
It’s still possible to forget that Optimized Battery Charging is activated. If you’re in a rush, the feature could prevent your iPhone from charging all the way. Some users may be better off without turning on Optimized Battery Charging, especially if you need to top off your iPhone a few times a day.
Charge Your iPhone With the Original Charger

The iPhone comes with a charger, and it’s the best one to use. Apple quietly added new power management ICs to the iPhone 6, enabling faster charging. Using a faster charger, such as the one supplied with the iPad, users can charge an iPhone rapidly. I suspect this capability has been around for some time. I once charged my iPhone 4 with an iPad 2 charger, and it charged quickly, but became noticeably warm. I never did this again!
Apple’s rapid charging technology has been expanded with newer iPhones, such as the iPhone 8, iPhone XR and iPhone XS. These newer devices can charge from 0% to 50% in 30 minutes. Apple actually recommends this! The problem is that rapid charging tends to damage the battery. It could possibly damage other internal iPhone components.
Rapid charging increases the temperature of the battery, which can also affect other components in the device. It will definitely shorten the lifespan of your iPhone — both the battery and the device itself. If you doubt this, try it yourself. You will be able to feel the difference, as rapid charging will make your iPhone much warmer than using the appropriate charger.
Heat is really the enemy of your iPhone. It will ruin the battery, but if your iPhone gets too warm, it could damage components.
Calibrate Your iPhone Battery
Older iPhones used to come with a small pamphlet, giving users a few tips in terms of care. My first iPhone was the fourth generation model. (I can’t stand AT&T, so I waited for the Verizon iPhone.) The manual supplied with this iPhone advised users to fully drain and charge their iPhone once a month. This process is known as battery calibration.
Unfortunately, Apple products are highly scrutinized and Cupertino often has to stonewall their users in order to prevent the next undeserved and overblown Apple-gate. (iPhones aren’t hammer proof? Epic fail! Class action lawsuit!) Even though calibration is still necessary, Apple no longer recommends this procedure. None of their competitors recommend battery calibration. After all, a failing battery may encourage users to upgrade to a new device. Calibration could be seen as an Apple-specific flaw by consumers. It appears that Apple has removed this recommendation for the sake of better marketing.
Battery calibration still must be done, even with the newest iPhone XS and XR models. These devices still use lithium-ion batteries. iOS still needs to gauge the battery life range of the iPhone.
The battery life graphic you see in the corner of the screen is just an estimate. It becomes less accurate as the battery ages. Calibration helps iOS find the full charge capacity range of your iPhone’s battery. If your iPhone is shutting down unexpectedly before it reaches 0%, calibration usually fixes it.
Beyond making the battery meter more accurate, calibration can extend the lifespan of your battery. According to Apple’s iPhone 4 pamphlet, draining the battery all the way ensures that individual lithium ions do not seize from inactivity. This can happen if you constantly top off your iPhone.
You do not need to calibrate your iPhone often. Apple’s old iPhone 4 manual suggested doing it once a month. I don’t even do it that often. If you do it too often, you will be using up more charge cycles than if you didn’t calibrate it. Your battery won’t last longer if you do that. It’s best to calibrate when the opportunity presents itself — your iPhone battery is almost drained and you won’t need it for a while.
I wrote an article on iPhone battery calibration a few years ago. It’s one of the most popular and controversial articles on Appledystopia. Some people get nasty about it, claiming that this is just a myth. Beyond the mountain of evidence from Apple, Apple Geniuses and Battery University, some still buck at the notion of battery calibration. I know it works, as I still have an iPhone 4 that I charge once every two weeks. I use it as a clock and flashlight. My iPhone 6 is four years old. I replaced the battery recently, only because of the $29 special. Prior to battery replacement, my iPhone had 97% battery “health” after 4 years of use.

There is no doubt that battery calibration works. It works for any lithium-ion powered device with a smart battery (electronics that measure and estimate battery charge capacity). I’ve been doing this for years, before I even knew it had a name.
Please read “How to Calibrate iPhone Battery” for more information. Share this with everyone you know! If you read the comments, you will see how many people have thanked me for writing the article. Calibration works! You will also see a few people who claim it doesn’t work, yet offer no explanation. Some people are so loyal to Apple that they deny the laws of physics. Others are angry that calibration did not solve their problem. Battery calibration will not fix an old, worn out battery. One needs to have realistic expectations.
If you doubt battery calibration, just go into an Apple Store and ask a Genius about it. They calibrate batteries all the time. Apple keeps it on the down low. They want you to go to an Apple Store, as you may end up walking out with a new purchase. If they published anything about battery calibration these days, it would surely be the next Apple “gate”.
Replace Your iPhone Battery

Lithium-ion battery lifespan can be preserved, however, some will reach the point where battery replacement is ideal. The days of a free iPhone with a two year contract are over. Buying a new iPhone is typically going to cost more than replacing the battery. Battery replacement can make your old iPhone perform like new again.
iPhone battery replacement typically costs $79, however, it sometimes costs less. In 2018, the Apple-gate of the year centered around slowing down iPhones with failing batteries. Although this was done to prevent iPhones from shutting down unexpectedly, a few squeaky wheels complained, and Apple issued the ultimate mea culpa. They re-engineered iOS to allow users to disable device throttling due to a failing battery. I guess some people prefer unexpected shutdowns? They also reduced the price of battery replacement to $29.
Apple normally requires battery “health” to be below 80% to qualify for a replacement. A Geek Squad agent told me that Apple won’t even let them open an iPhone unless it meets certain diagnostic criteria. This is done to protect consumers from unnecessary repairs. If an iPhone with a healthy battery is shutting down, they will typically just calibrate the battery.
The 2018 battery replacement program waives the “below 80% battery health” requirement. Apple will replace any iPhone battery, so long as the device is an iPhone 6 or later. My iPhone 6 had 97% battery health, and the Geek Squad rejected me. I called Apple and they said Best Buy was incorrect. Apple agreed to replace my battery. I had to send it off, which took more time than taking it to a brick and mortar Best Buy, Verizon or Apple Store. I decided to send it off, because I could only anticipate more confusion over this issue at a retail outlet.
No wonder people are shopping online these days. I have three certified Apple repair shops within walking distance, but I sent off my device, because I didn’t want to be hassled by a retail employee.
UPDATE: The $29, “no questions asked” battery replacement program ended on December 31, 2018. As of January 2019, Apple will replace iPhone batteries for $49 or $69, depending on the model. Check out Apple’s website for more information.
Turn on Low Power Mode
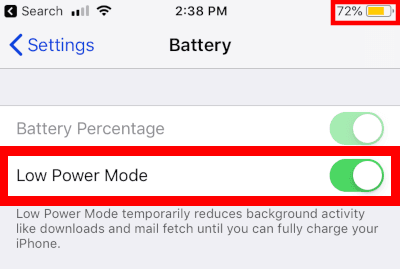
Apple introduced Low Power Mode back in iOS 11. When your battery charge drops below 20%, iOS will prompt you to turn on Low Power Mode. I’m sure everyone has seen these notifications. Not everyone knows that you can turn on Low Power Mode at any time. Doing so will prolong battery life and also minimize heat stress on your battery. I use it all the time. You can activate Low Power Mode by tapping on Settings > Battery. The battery meter graphic is orange when in Low Power Mode.
Living in the San Francisco Bay Area, I have to admit, we have the worst Internet connectivity on the planet. Even third world nations have better Internet access than the Silicon Valley. My condo complex doesn’t have one single decent Internet service provider. In 16 years, I’ve tried them all, and they’re all horrible. Comcast is ridiculously bad. I am moving out of the Bay Area, partly because of this issue. Unfortunately, they operate as a de facto monopoly in my neighborhood (and much of the nation). But, for now, I have switched to Google Fi and use my iPhone’s hotspot feature for backup Internet access. It actually gets used a lot.

Whenever I use my iPhone as a WiFi hotspot, I make sure to put it in Low Power Mode. I was worried that using my iPhone in this manner would destroy the battery. This is not the case. In fact, I can use my iPhone as a WiFi hotspot, connect it to my Apple TV, and watch hours of HD video. Surprisingly, it doesn’t use up too much battery life, and even less with Low Power Mode activated. If you’re going to be watching Netflix on a plane, or something similar, turn on Low Power Mode. You’ll get more playback time while prolonging your iPhone battery’s lifespan.
Review Battery Usage Report
iOS 11 introduced a new battery usage report, which has been improved in iOS 12. If you’re wondering which apps are draining the most battery power, this report is indispensable. There have been cases where sloppy coding has led to apps that devour battery power. I remember a version of Google+ that drained my iPhone battery rapidly. In fact, it was such a power hog, it made my then brand-new iPhone 6 almost hot enough to fry an egg.
You can view the battery usage report by tapping on Settings > Battery. Scroll down to read the entire report.

Turn on Airplane Mode When Possible
Cellular data can be a potential power hog. It all depends on the strength of your cellular signal. A weak signal forces cellular components to use more power. When your battery and cellular components are working harder, they generate more heat. This could diminish your iPhone’s lifespan.
There was an extreme example of this a few years ago. A teenage girl’s iPhone ignited on a flight. It turned out that her iPhone was not in Airplane mode, which forced the device to use much more power in order to maintain a cellular connection. In addition to this stress, she was watching a movie, which increased draw on the battery. This caused her phone to overheat and catch fire. I’m sure Apple has patched this flaw (for this extreme case), but it illustrates the point that a weak cellular signal can actually destroy an iPhone.
You can check the strength of your cellular signal by looking at the bars on the top left of the screen. If you only have one or two bars out of four, it’s a good idea to turn on Airplane mode when not in use.

If you are at home, in the office or anywhere that has a WiFi network, I recommend connecting to WiFi. (If you use a lot of public WiFi hotspots, VPN can protect you from hackers and cyber attacks.) Most carriers have offered WiFi calling for a few years now. Even with WiFi calling turned on, you still need to explicitly disconnect from your cellular network. Airplane mode is the best way to do this. If you only turn off cellular data, LTE voice calling is still enabled. Your iPhone will still try to connect to the nearest cell tower.
Control Center offers the easiest way to turn on Airplane mode. Simply swipe up from the bottom of any screen to display Control Center. Next, tap on the Airplane mode icon. It looks just like an airplane. You can turn on WiFi after you have turned off Airplane mode. This has the effect of keeping you connected to WiFi, while all cellular connections have ceased. With WiFi activated, your iPhone should be able to make and accept phone calls using WiFi calling.

Keep in mind that not all carriers offer WiFi calling. In researching this article, I was surprised that Google Fi doesn’t support WiFi calling. (They were not upfront about this.) I still really like the service, and hope they will add it soon.
If your carrier supports WiFi calling, I strongly recommend activating this feature. Simply tap on Settings > Phone > WiFi Calling to turn it on. You will only see this option if your carrier supports WiFi calling.
Even though Google Fi doesn’t support WiFi calling, I still turn on Airplane mode. My cell phone number is over 20 years old. 90% of my calls are from telemarketers and con artists. Airplane mode gives me peace and quiet, while prolonging the life of my iPhone.
Clean Your iPhone with a Microfiber Cloth
Every iPhone model is engineered with durability in mind. Even my ancient iPhone 4 looks brand new. My iPhone 6 is in remarkable shape. After 4 years of use it doesn’t even have a scratch on its aluminum back. I never use a case.
I recently purchased an iPhone 13 Pro Max. With its Ceramic Shield-protected screen, it’s virtually indestructible. I accidentally dropped it, and it went face down onto the metal base of my nightstand. The screen didn’t crack. Nothing even got scratched. It’s a remarkably robust smartphone.
Although the iPhone is durable, touch screens don’t last forever. When cleaning the iPhone, it’s important to exercise care with its touch screen. Harsh cleansers can damage the oleophobic coating. With too much abuse, the touch screen can fail to register input.
The best way to clean any high-value device is with a microfiber cloth. Don’t use any detergents or solvents when cleaning your iPhone. Microfiber cleans exceptionally well, without any abrasiveness.

If your device is heavily soiled, you may need to use a mild cleaning agent. I recommend eyeglass wipes for this purpose.
Be advised that some eyeglass wipes are actually abrasive and use harsh detergents. If you get a brand that’s safe for anti-reflective (AR) coatings, it will also be safe for your iPhone. I personally use Zeiss Lens Cleaning Wipes.

There are other brands of safe, mild eyeglass wipes. Flents eyeglass wipes (sold at Costco) are not as gentle as Zeiss and other brands. I previously used Flents to clean my eyeglasses, and they eventually stripped off the AR coating, unevenly, which forced me to buy new glasses. Talk about being penny wise and pound foolish! Don’t clean a $1000+ iPhone with cheap eyeglass wipes! Beyond damaging the coating, these cheap eyeglass wipes leave behind pieces of lint from the wipe’s fibers.
To be fair, Flents admits that their wipes are not intended for anti-reflective lens coatings. Unfortunately, these are pretty standard on modern prescription glasses. Their packaging claims that their wipes are great for electronics. That’s simply deceptive marketing.
Avoid Using Physical Buttons and Switches
Apple is gradually eliminating moving parts from devices, as they’re prone to failure. Although I personally haven’t had a problem with the physical home button or sleep/wake button, I am well aware that they can break. After all, a Home button can only take so many presses before it wears out. I do notice that the Home button on my iPhone 4 is occasionally unresponsive. I’ve had the device for over 8 years, so this doesn’t upset me.
The less you use your Home and Sleep/Wake buttons, the better. Here are some tips as to how to avoid wearing out the buttons on your iPhone:
1. Set a longer Auto-Lock setting (Settings > Display & Brightness > Auto-Lock).

This reduces the need to keep unlocking your phone. You probably don’t want to set it to “Never” all of the time, however, this can reduce wear on your Home button if you need to refer to information on your iPhone. For example, if you’re cooking from a recipe on your iPhone, setting Auto-Lock to Never will keep the instructions visible. It will also prevent you from greasing up your iPhone, depending on what’s cooking. I do this all the time during AirPlay sessions, so I can change up my music or video content without constantly unlocking the device. Turning down screen brightness can reduce power consumption while the device is left unlocked.
Conversely, you can set Auto-Lock to a short duration to lock your iPhone without touching a physical button. Unfortunately, this requires the user to wait at least 30 seconds before the device locks. AssistiveTouch offers a better way to lock your iPhone without wearing down the physical buttons.
If you get tired of constantly drilling down into Settings to change Auto-Lock, there’s a better way. Just launch Siri and say “Auto-Lock Settings” and it will take you right there. Again, AssistiveTouch offers a convenient way to launch Siri, without pressing the physical Home button.
2. Use AssistiveTouch.
AssistiveTouch is part of Apple’s Accessibility features. Although many of these features are intended for the disabled, some of them are useful for all. You can turn on AssistiveTouch by tapping on Settings > General > Accessibility, then turn on the AssistiveTouch switch.
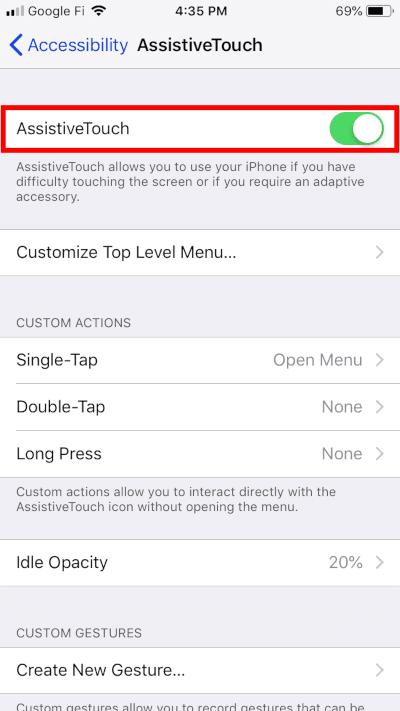
A small circle will appear on the screen. Tapping on the circle displays an array of controls, including a virtual Home button. You can drag and drop the AssistiveTouch circle around the edges of the screen. Apple even allows users to adjust its opacity. I suggest making it transparent enough to see “behind” it, yet opaque enough to be visible.

The Home button works almost like the physical button, however, it cannot do Touch ID. You will still need to unlock your iPhone using the physical Home button (unless you have opted out of these security features). That said, the virtual Home button should reduce wear and tear on its physical counterpart.
I haven’t used AssistiveTouch in years, and I just started using it while doing research for this article. I now use it regularly. You can easily turn AssistiveTouch on and off using Siri commands (“turn on AssistiveTouch” and “turn off AssistiveTouch”). This comes in handy, as the feature can interfere with games. I find placing the control at the top center of the screen prevents it from getting in the way, most of the time. I turned opacity down to 20%, so I can still see the clock.
I now use AssistiveTouch to launch Control Center, virtually press the Home button and lock my device. It can do so much more and has extremely powerful customization options. People who claim iOS is not customizable have clearly overlooked AssistiveTouch!
3. Shut down your iPhone from Settings.
Recent versions of iOS include a software option for shutting down the device. Prior to this feature, users could only do this by holding down the Sleep/Wake button or depleting the battery. My hunch is that Apple added this feature in case the Sleep/Wake button breaks. Simply go to Settings > General > Shut Down and then slide the on-screen switch to shut down your iPhone. I do this with both my iPhone and iPad.
4. Adjust volume using Control Center or Assistive Touch
Physical volume controls are a necessary fixture on the iPhone. The newest iPhone XS and XR models have physical volume, mute and side switches (formerly known as the Sleep/Wake button). This makes perfect sense. If your phone starts blaring in a meeting, you need to silence it quickly. It’s not the time to be drilling into Settings menus. These buttons will probably be present on the iPhone for years to come. They could possibly fail if used too often and with too much force.
Control Center provides quick and easy access to volume settings. Simply swipe up from the bottom of any screen to launch Control Center. From there, slide down the volume control with your finger. I try to adjust volume using Control Center as often as possible, sparing the physical buttons for urgent, immediate silence.
5. Mute ringer using Do Not Disturb.
The Mute switch seems very fragile, but it’s actually pretty rugged. Every iPhone I have owned has a bit of wiggle in the mute switch. It makes me think that the switch will break, but so far, this hasn’t happened. Even my old iPhone 4 has a working mute switch.
That said, I try to avoid using the physical switches as much as possible. I fear that the mute switch may break and be stuck in the mute position. I have found that Do Not Disturb mode is far more useful than the mute switch.
The easiest way to turn on Do Not Disturb mode is from Control Center. Simply swipe up from the bottom of any screen and tap on the crescent moon icon. Once activated, notifications about calls, texts and other communications are suppressed. You won’t hear a peep from your iPhone.
I have had the same cell phone number for over 20 years. This means that I am inundated with telemarketing calls. I leave Do Not Disturb mode on most of the time. It is only turned off when I am expecting an important call. This means that I need to check my call log all the time, but it’s a small price to pay for peace and quiet. Without either muting the device or turning on Do Not Disturb mode, my iPhone sounds like a 1980s video arcade. Yes, I get that many telemarketing calls, mostly from offshore con artists. I also use a Pac-Man ring tone. (Just kidding…)
6. Mute ringer using volume controls.
Apple replaced the physical Home button with a solid state implementation on the iPhone 7. It’s essentially a touch surface with no moving parts that can break. There is a haptic engine that creates the sensation of pressing the button. If this breaks, however, your Home button should still work.
With the iPhone X, the Home button has disappeared altogether, replaced by Face ID. Good riddance! If they could only eliminate the mute, side and volume buttons, iPhones would only have one moving part — the haptic engine. Of course, these few remaining buttons are essential. If you’re in a theater or meeting and your phone starts ringing, immediate access to the mute switch is essential.
You can still mute or turn down your ringer without using the volume buttons. Simply go to Settings > Sounds to adjust both the sounds and their levels. This isn’t as convenient as using the physical volume buttons, but it gets the job done.
7. Mute ringer using AssistiveTouch.
AssistiveTouch is a jack of all trades and a master of all. Having revisited this feature while researching this article, I am truly impressed. It really can control just about anything on your iPad, including the mute switch.
Assuming you’ve setup AssistiveTouch using the instructions previously provided in this article, tap the AssistiveTouch control. Next, tap on Device and then Mute. This will mute the ringer without using the physical mute switch.
Using a software switch to mute the ringer poses one possible problem — the actual mute switch is misleading. You can have the physical mute switch turned on, but it can be overridden by the software switch. If you’re not careful, your iPhone could ring at an inopportune moment. If you use AssistiveTouch to mute the ringer, you may want to make sure it is muted. Better yet, put your iPhone in Do Not Disturb mode when in meetings, movies or Keith Jarrett concerts.
Make Sure You Have at Least 1GB of Available Storage
The iPhone doesn’t have a lot of RAM. Critics have screamed bloody murder over this issue, however, you can’t compare an iPhone with its competitors. It runs a vastly more efficient operating system. With the introduction of the first 64-bit smartphone processor with the iPhone 5S, iOS devices can feasibly use solid state drive (SSD) space as virtual memory.
Windows power users are probably familiar with virtual memory or swap space. It’s usually the reason why your Windows hard drive churns itself into failure after a few years, regardless of how much RAM you put in the system.
Apple is opaque about many of the inner workings of iOS. After all, transparency gives competitors and hackers an edge. (Open source is not a panacea.) No one is sure if iOS uses virtual memory or swap space in the typical way — allocating memory dynamically to apps that need it.
We do know that developers can use the SSD as read only memory — for example, assets for a video game. Many users suspect that Apple added dynamic virtual memory technology to iOS 9. The 64-bit architecture can definitely use the SSD as swap space, and this is most likely the case.
Further anecdotal evidence seems to indicate that as an iPhone’s SSD starts to reach capacity, the device slows down. This may be due to a lack of swap space.
Researching this issue, many users contend that one should keep 1 GB of storage space free for use by iOS. If your device is running slow, tap on Settings > General > iPhone Storage. You’ll see a line graph depicting storage allocation, used space and free space. If you have less than 1 GB of free space and your iPhone is running noticeably slow, you may want to free up some storage space.
Before you get upset with Apple and dream up a conspiracy theory (They’re doing this to up-sell iPhone storage… NOT!), keep in mind that iOS 12 frees up a lot of storage space. The introduction of HEVC and HEIF encoding, in addition to the new Apple File System, has actually given iPhone users more free space. If you haven’t upgraded to iOS 12 yet, this is a compelling reason to do so.
If you’re on iOS 12 and you’ve managed to fill up the reclaimed storage space, your only option is to delete content. Most users can do this by deleting iTunes movies and music files, which take up the most space. You can also bounce a lot of photos and user-created videos to iCloud, and then delete them. The iPhone Storage screen gives users many suggestions as to how they can free up space. Just make sure not to delete anything that you can never get back.
Erase All Settings and Content
Windows power users know that wiping out Windows, reformatting the drives and reinstalling the OS can breathe new life into a latent computer. This concept is foreign and strange to most Mac users, but when I used Windows, it was not uncommon to do this three or four times a year.
Some operating systems accumulate extraneous files and “baggage” from users who install way too many apps. There are myriad apps that grow in size and accumulate cache files, log files and other detritus. Operating systems index all of the apps you install to facilitate search features. All of this accumulating data eventually slows some operating systems down.
I am not a huge fan of iOS. I think it’s a great mobile operating system, however, Apple has been trying to transform it into some quasi-desktop OS. As iOS gets more complex, it seems to accumulate more metadata, cache and other files that users can’t see or access. Although they don’t take up a lot of storage space, they tend to slow devices down, especially with search and other features that work across several apps. Wiping out your iPhone and restoring it can often breathe new life into a slow, frustrating device.
Fortunately, Apple makes it extremely easy to wipe and restore an iPhone. By default, your iPhone is being backed up to iCloud. iCloud only backs up the data, not the apps or iTunes content downloaded onto your device. After all, you can download those later. You own all of your apps. They’re tied to your Apple ID and you can install them across all of your iOS devices.
There are a few considerations to take into account before erasing and restoring your iPhone. First, if you have any apps that Apple or developers have removed from the App Store, you won’t be able to get these back, unless you back them up with iTunes or some third-party iPhone backup software. This is beyond the scope of this article and very few people have apps that are no longer available on the App Store.
There are some apps that don’t backup their content to iCloud or any cloud service. For example, I have an iOS text editor that saves all files locally. It’s not backed up by iCloud. I had to bounce these files to my Mac before I erased my iPhone.
Before you wipe out your iPhone, ensure that you have a fresh iCloud backup. Tap on Settings and then tap on your Apple ID at the top of the screen. Next, tap on iCloud, then scroll down and tap on iCloud backup. You’ll need to plug your iPhone into a charger for the backup to commence. If you have already recently backed up your iPhone, you can go ahead and wipe it clean.
Erasing an iPhone is easy because it doesn’t completely delete the contents of the solid state drive. If you’re a Windows power user, you may go all the way down to a low-level format, then a Windows format, and then install Windows using external media. You won’t need to do that with an iPhone. It will only erase apps, content and those pesky system files and caches that seem to accumulate. This means that the whole process is pretty fast — nothing like reinstalling Windows on a PC.
To erase your iPhone, simply go to Settings > General > Reset. Next, select Erase All Content and Settings and confirm all of the prompts. The reset happens very quickly. Within a few minutes, you’ll be guided through a first-time configuration process. Basically, it’s like you have a new iPhone.
Now that your iPhone is a blank slate, you can restore your backup. This will restore important data, such as Contacts and documents that are backed up by iCloud. Keep in mind that the apps you’ve previously installed will be reinstalled with the backup, even though they are not backed up. Apple just downloads these apps from the App Store. All of your photos, videos and other content will also be restored.
Be Careful About Upgrading iOS on Older Devices
This tip really resonates with me. I still remember how much I regret upgrading my iPad 2 to iOS 8. Apple shouldn’t have offered this update for the iPad 2. It rendered the device unusable. I do think they did this on purpose, in order to drive iPad sales. Ever since this incident, I never upgrade iOS until other guinea pigs have tried it out.
iOS is so different from OS X and macOS. I still have a very old 2009 Mac Pro. It still just works, and runs reasonably fast. I noticed that many of the OS X updates actually *increased* performance on this aging system. As I have pointed out earlier, iOS is not OS X/macOS. It’s not nearly as good and may have some aspects of cynical design, such as planned obsolescence. The iOS 8 siren song made my iPad 2 crash into the rocks.
If you do happen to upgrade to a slow version of iOS, there are a few things you can do. If the previous version of iOS is still available (signed), you can reinstall it. There is a very small window to do this in, as Apple quickly “un-signs” the previous version of iOS a few days after the new one is released. Also, this is a relatively intensive process, and is far beyond the scope of this article.
If you can no longer install the previous version of iOS, restoring your device to factory settings can really help. I did this with my iPad 2. This really sped up the device, however, it was still much slower than iOS 7. Apple won. I eventually bought one of the inexpensive new iPads that has twice as much storage space and runs ten time faster, for half the price of my old iPad 2.
Even though Apple kind of swindled me, I wouldn’t throw out the baby with the bath water. Their competitors are far more greedy, cynical and predatory. The iPad is the best tablet on the market today.
Old iPhones are Still Useful
You can pamper your iPhone all you want, but just like living things, devices have a lifespan. My old iPhone 4 will eventually fail. Most likely, the lithium-ion battery will stop holding a charge, and it’s not worth fixing. When that happens, I can only say that it served me well, for a decade, as my primary phone and then a clock/flashlight/timer.
There are actually many uses for an old iPhone. One of the most obvious is to use it to buy a new iPhone. Old iPhones are often still worth something. When the new class of iPhones is released, trade in deals for old iPhones abound. I highly recommend taking advantage of these, as this best way to use an old iPhone.
Beyond trade-in deals, there are many companies like Gazelle and Swappa that buy old iPhones. I’ve never sold an iPhone, so I don’t really have an opinion as to which is the best service. I recommend doing your homework and finding a reputable buyer.
If your iPhone is too old to sell or trade in, there are myriad uses for it. When I get a new iPhone, my old iPhone 6 will become a music player for my car. It will replace a 15-year-old iPod Classic that still “just works”.
Apps such as Alfred can turn your old iPhone or iPad (or just about any smartphone, tablet or computer) into a home security system. There’s also numerous baby monitoring and surveillance apps.
Whatever you do with your old iPhone, the better you take care of it, the longer you can use it. I hope the tips in this article prove helpful and will provide longevity for your iPhone.