


August 15, 2013 at 3:30 p.m. PST
Upgrading iOS is a simple task. Having done this several times, I haven’t encountered any issues. Unfortunately, not everyone’s upgrade goes smoothly. By following an upgrade process, you can minimize risk and make sure none of your personal data are lost. This article details best practices for upgrading iOS.
Should You Upgrade?
Although I haven’t experienced any problems upgrading my iPhone or iPad, it isn’t a bulletproof process. If you rely on your iOS device for work, you may want to wait before upgrading. Your device may be supplied by your employer. If this is the case, check with your IT department before upgrading.

If you have multiple iOS devices, upgrade the non-essential one first. I always upgrade my iPad and try it out for a few days. If there aren’t any major issues, I’ll upgrade my iPhone. While this doesn’t guarantee that my iPhone will upgrade smoothly, it does provide some insight as to the stability of the release.
When you upgrade to a new iPhone, iPad, or iPod Touch, it is a good idea to keep the older device. You can use the device to test iOS updates. In fact, an old iPhone with its cellular data plan disabled is practically the same thing as an iPod Touch. It’s better to keep your old iPhone than sell it or throw it out.
Always do your homework before committing to an upgrade. Search the web for information about the upgrade, but put it in perspective. There are hundreds of millions of iOS users. Some people report issues after upgrading, but sometimes these are coincidental. The iPhone is sold throughout the world. Someone in the U.S. on Verizon or AT&T may have a different experience with an upgrade than someone in another country. Appledystopia is a good source of information about iOS upgrades. In addition to my own experience, there are comments from many users around the world detailing their issues.
Before You Upgrade
Once you upgrade, you cannot rollback to a previous version of iOS. This is unfortunate and something I wish Apple would change. I have never needed to rollback iOS, however, there are a few people who upgrade and have major problems. It seems like good customer relations to allow people to downgrade iOS. Although you can’t back out of an iOS upgrade, it’s a good idea to back up your device before proceeding. A few users report losing photos or contacts after upgrading.
Before you backup, take a moment to capture screen shots of your most important settings. The backup should capture your settings, but it may not have these for third-party (non-Apple) apps. To take a screen shot, simply hold the top power button and click the home button. This needs to be done quickly, or it will just lock your screen. You should hear a camera shutter sound when the screen shot is taken. The screen shot will be saved to your camera roll. This is just a precaution. Your apps will be in the same state after the upgrade.
Backing up your device will safeguard your camera roll, accounts, documents and settings (mail, phone favorites, wallpaper, contacts and calendar). You do not need to backup iTunes purchases or apps. These can always be re-downloaded later, in the unlikely event that they disappear after the upgrade. Similarly, iCloud documents, such as Reminders and Notes live on Apple’s servers. These will be in the same state after the upgrade.
If you backup with iTunes, your apps will be backed up by default. iTunes purchases (movies, music, TV shows) can be backed up as well, however this is not necessary. I’ve found the process of moving iTunes purchases from my iPad to iTunes to be quite buggy and frustrating. It’s easier to just re-download the iTunes content again, if necessary. The upgrade process will not delete apps or iTunes purchases from your device.
There are two ways to back up your device — iCloud or iTunes. iCloud is the easiest, however, you might need to pay for more storage. Everyone is given 5GB of free iCloud storage. If you have a lot of personal data you will need to pay for more space. To backup to iCloud, simply tap Settings > iCloud > Storage & Backup. Next, turn on iCloud Backup. Finally, connect your device to a WiFi network, plug it in a charger and lock the screen. iCloud will automatically back up your device. You can also tap the “Back Up Now” button. When the process is finished, you will see a status message with the last backup date and time.


You may want to turn off iCloud Backup after the backup is complete. I don’t use iCloud Backup because it consumes too much bandwidth. I can’t use my Apple TV when iCloud is backing up. I prefer backing up with iTunes. It’s faster and it doesn’t choke up my Internet connection. The iTunes backup uses your local area network instead of the Internet.
If you choose to use iTunes to backup, you can either plug your device into your computer or use WiFi sync. Check out this article for more information on configuring iTunes WiFi sync.
There are a few ways to backup your iOS device with iTunes. If you are not using WiFi sync, plug your device into your computer with the USB cable, then start iTunes. If you have configured WiFi sync, simply start iTunes. If iTunes doesn’t find your iOS device for WiFi sync, quit iTunes and start it again. If it still can’t find your device, follow these steps to troubleshoot the problem. iTunes 11 has improved WiFi sync. It almost always detects my iPhone and iPad.
To manually initiate an iTunes backup, click File from the top menu bar and choose Devices > Back Up. You will see the backup status at the top of the iTunes window. When I tried to do this, these options were grayed out.
There is another way to initiate the backup. Using iTunes 11, click on the Devices button at the top right of the main window. A panel with your devices will appear. Click on the device you wish to backup.
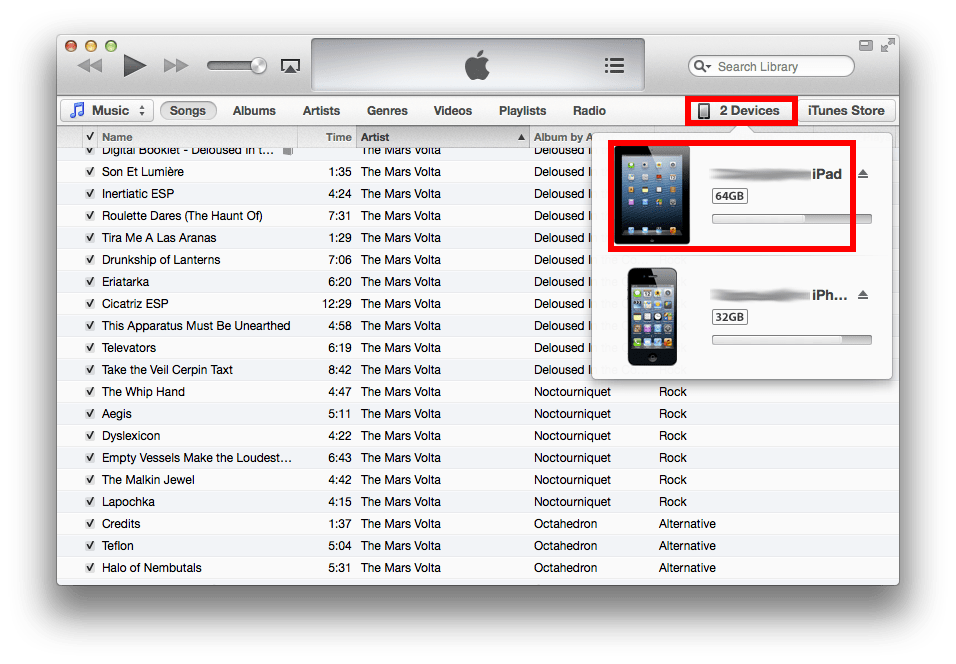
The summary screen for this device will appear. From this screen, click on the “Back Up Now” button.

When the backup is complete, you can confirm by clicking iTunes (on the top menu bar) > Preferences and then click the Devices tab. You will see the date and time of the most recent backup for each device. The device summary screen (pictured above) will also show the date and time of the last backup.
Backing up is only a precaution. You do not need to restore your iOS device after upgrading unless something is missing. Upgrading iOS should not delete anything from your device. I have never experienced the loss of any data, app, or iTunes content from an iOS upgrade.
Run the Upgrade
There are two ways to upgrade — over-the-air (OTA) or using iTunes. OTA is the easiest way, but you need a certain amount of free space. iOS 6 requires 2GB of free space. If your device doesn’t have enough room, you can upgrade using iTunes, which requires less free space. To find out the size needed for the upgrade, tap Settings > General > Software Update. Your device won’t let you upgrade if there is not enough free space.
You can check the amount of free space on your device by tapping Settings > General > Usage. Available storage is displayed at the top. You can free up space by tapping on any item. A screen with a breakdown of storage will appear. Simply slide your finger to the left on each item to display the delete button. Delete any items you don’t need. If you have backed up your device, you can restore items such as the camera roll.

If you have enough space, it’s best to run the OTA upgrade. It’s fast, easy, and can be done directly on your device. First, make sure your device is fully charged, then remove the charging cable. This will ensure that your device won’t get too warm while upgrading. You might even want to let it sit for several minutes to let the battery cool down. Next, set Auto-Lock to Never by tapping Settings > General > Auto-Lock > Never. This will ensure that the upgrade process runs and won’t stop when the screen locks. Finally, tap Settings > General > Software Update and follow the on-screen instructions.
If it’s not possible to free up a few GB for the iOS upgrade, you can try iTunes. Keep in mind, you still need some free space to upgrade iOS. However, since iTunes will store the upgrade files on your computer, upgrading with iTunes requires less available storage space on your device.
First, make sure you are running the latest version of iTunes and OS X updates. Click on the Apple icon on the top left of your screen and select “Software Update”. Your Mac will connect to Apple’s servers and check whether your software is up-to-date. If you need to update iTunes, it will be listed. Simply follow the on-screen instructions to apply the updates. Apply all of the updates, even if they aren’t for iTunes. The update process may restart your computer.
Next, connect your iPhone, iPad or iPod touch to your computer with the USB cable, then start iTunes. The update cannot be done over WiFi. Once iTunes starts, tap on the “Devices” button on the top right of the main iTunes Window. A panel will appear, listing your devices. Click on the device you wish to upgrade.
You will see a summary screen. Click on the “Check for Update” button. If there is a new version of iOS available, you can choose to download it or download and update. For the purposes of this article, select “Download and Update”. Follow the on-screen instructions.
Upgrade Problems?
If you experience problems while upgrading and see an on-screen alert, there are a few things you can do. This can sometimes happen if you have out-of-date software on your Mac. If you didn’t update your Mac before the upgrade, do this now. If your Mac is up-to-date, try restarting it, then run the iOS upgrade process again.
Make sure there are no other USB devices attached to your computer. Of course, you will need the keyboard and mouse or trackpad, if these are not wireless. Disconnect any other non-essential USB devices. You may need to restart the computer after disconnecting non-essential USB devices. You can also try plugging your iOS device into the USB port on your Mac, instead of one on a monitor, hub, or other location.
Another possibility is that security software is blocking the upgrade. Make sure that you can connect to the iTunes store and that there isn’t any firewall or malware blocking software preventing the upgrade. You may want to temporarily disable any virus scanning or security software while you proceed with the upgrade.
Post Upgrade Tasks
After your upgrade is complete, your iOS device will restart. If this is a significant update, you will be guided through a “wizard” to make some configuration choices. This is a very user-friendly process. Simply follow the on-screen instructions.
Once your iOS device is back on the home screen, it’s a good idea to update your apps. Tap on the AppStore icon and then tap “Updates” at the bottom of the screen. If you have many apps pending update DO NOT tap the “Update All” button. This will tie up your device and network for a long time. Even if you have a fast Internet connection, Apple’s backend will be the bottleneck. It’s best to tap the update button on a few apps, wait until they are updated, and continue. Some of your apps may be critical to business. If this is the case, you may want to research the new version of the app to make sure it doesn’t introduce any new or regressive bugs.
Check your camera roll, contacts, documents and settings to ensure that everything is there. If not, you can restore these from the backup you made prior to upgrading.
Finally, if everything checks out, make sure to set Auto-Lock back to the previous setting (Settings > General > Auto-Lock). iOS upgrades will sometimes turn on Bluetooth automatically. If you normally leave Bluetooth off, make sure to turn it off after upgrading. If you have iOS 7 or later, you can turn off Bluetooth by swiping up from the bottom of the screen. This will display Control Center. From here, you can turn off Bluetooth. If you are running a version of iOS prior to 7, you can turn off Bluetooth by tapping Settings > Bluetooth, and then switch Bluetooth off.
Restore If Necessary
Are you missing any personal data after upgrading? While this is highly unlikely, it is possible. If this has happened, restoring your iOS device from the backup should fix the problem. Restoring will not rollback to the previous version of iOS. It will only restore your documents, settings, camera roll and accounts.
If you used iCloud to backup your device, you must first erase the content on your device and then restore. To erase the content, tap Settings > General > Reset > Erase All Content and Settings. You will then be prompted to “Set Up as New” or “Restore from iCloud Backup”. Choose the latter option.
Restoring from iTunes is a different process. First, connect your iOS device to your computer with the USB cable. You cannot restore the device with WiFi sync. Launch iTunes and wait until your device is detected. There are two ways to restore your device. You can click the File menu, then select Devices > Restore from Back Up. If this option is grayed out, use the alternative method. Click on the “Devices” button on the top right of the main iTunes window, then click on the device you would like to restore.
The Summary screen appears. Click on the “Restore Backup” button and follow the instructions. Your device will be restored.
Problems?
Some users reported issues with grayed out WiFi after upgrading. Other users experience Bluetooth problems. Reports of battery life issues after upgrading are common. It’s a good idea to re-calibrate your iPhone, iPad, or iPod Touch battery after an iOS upgrade. First, use your iOS device until the battery runs out. Leave it off for a few hours, then charge it all the way to 100%. This will reset the battery meter. The upgrade doesn’t decrease battery life. Your device just needs to have the battery meter re-calibrated.
Upgrading iOS is a simple process. Most users are able to do this without experiencing any problems. Following these best practices will make for a smooth upgrade process. I have yet to experience any problems with an iOS upgrade. Even if you have never faced a problem, it’s still a good idea to follow these steps to ensure that your personal data is not lost. It’s also a good idea to backup your device regularly.