

June 11, 2016 at 2:37 p.m. PST
Apple TV 4 features built-in WiFi, making it easy to connect to your home network. This article covers how to fix any problems that may arise with Apple TV 4’s WiFi connectivity.
WiFi is something we take for granted these days. Few people remember the days of ethernet cables or even dial-up Internet access. For the most part, we connect to a WiFi network and it just works. Unfortunately, this isn’t always the case. Sometimes WiFi doesn’t work or is slow and causes frustrating pauses in video playback. Let’s take a look at how to set up WiFi connectivity on Apple TV 4 and troubleshoot problems that may arise.
Setting Up Apple TV 4 WiFi
If you own an iPhone, setting up WiFi on a new Apple TV 4 couldn’t be easier. Simply follow the on-screen instructions and your iPhone’s preferred WiFi network will be transferred over to your Apple TV 4. You can also set up WiFi without an iPhone. The initial configuration screens guide you through this process. You just need to select your WiFi network and enter the password.

You may need to change your Apple TV 4’s preferred WiFi network if you get a new router or switch Internet service providers. You can even use your iPhone as a WiFi hotspot if your Internet connection goes down. Changing WiFi networks on Apple TV is easy.
First, launch the Settings app from the Home screen. You can also hold down the Siri button and say “settings”, however, this will only work if you are connected to the Internet. The Settings screen appears. Use the Touchpad to select and click on Network. The Network screen appears with the WiFi connection highlighted. Click the Touchpad to browse WiFi hotspots. The WiFi screen appears and is eventually populated with a list of WiFi networks. Select your network of choice from the list. The WiFi password screen appears. Enter the WiFi password or use Siri to spell the name. Siri dictation will work without an Internet connection, but I have found it incapable of interpreting some letters, such as “b” vs. “p” or “t” vs. “d”. It’s often easier to use the on-screen keyboard. Select and click on Done when you’re finished entering the password. Apple TV will either connect to the network or display an error message.
You may not see the name of your preferred network in the list. This is a common problem. I have two WiFi networks and Apple TV rarely lists the 2.4 GHz network. If you don’t see your preferred network in the list, scroll down and click on “Other…”. Enter the name of your preferred WiFi network and click Done. Sometimes Apple TV still can’t find this network. Keep trying until you can connect. There may be some interference, especially if you live in a densely populated area. This is often a problem with specific WiFi bands or channels. We’ll take a look at WiFi bands and channels later in this article.
Apple TV 4 WiFi Signal Strength
If everything went well, you were able to connect to your preferred WiFi network. If not, we’ll take a look at tuning your WiFi router later in this article. Assuming you are connected, let’s make sure you’re getting the strongest WiFi signal possible.
The Network setting screen displays WiFi signal strength. You can see this screen by going to Settings > Network. WiFi signal strength is indicated by 5 dots next to the Signal Strength label. Ideally, all 5 dots should be filled in. If you are only seeing a few dots filled in, you may experience problems when streaming video.
Placement of your Apple TV is a critical factor influencing WiFi signal strength. Make sure your Apple TV isn’t enclosed in a cabinet or furniture. This is also a good idea in terms of keeping your Apple TV from overheating, although it’s unlikely to happen. You should also place your Apple TV away from any other WiFi device or wireless electronics. Placing your Apple TV higher up, such as on a shelf, will also enhance WiFi signal strength.
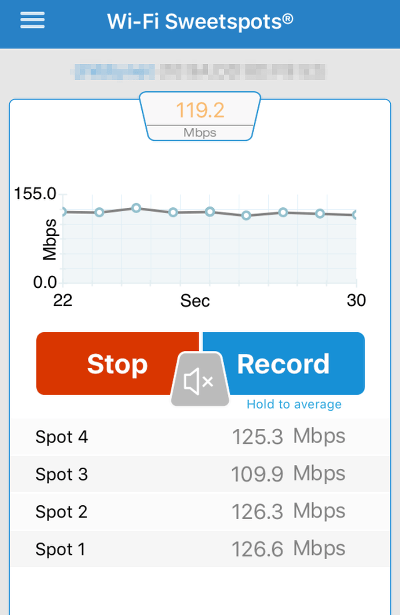
Wi-Fi Sweetspots is a free iOS app that can help you determine the best location for your Apple TV 4. Download the app from the App Store and launch it. Tap the start button and move your iPhone (or other iOS device) to preferred locations for your Apple TV. Tap the record button to capture the WiFi signal strength of a particular location. Using this app, you can easily find a suitable location for your Apple TV 4.
If you still can’t get 4 or 5 WiFi “bars”, you may want to consider using an ethernet cable. Most WiFi routers have a few ethernet ports. Simply connect the ethernet jack on your Apple TV to the one on your router using an ethernet cable. Apple TV should automatically connect to your wired network. You may need to configure your router to allow ethernet access. Most consumer network routers will work without any additional configuration.

For some people, ethernet is not an option. In my case, my router is in a different room. I would need to run 50 feet of cable through a few rooms to use ethernet. If attempts at placing your Apple TV in different locations aren’t producing a stronger WiFi signal, there are some other options. It may be possible to adjust your WiFi router or even extend the network.
Optimizing WiFi Router Configuration for Stronger WiFi
For most people, the default WiFi router configuration will work with Apple TV 4. If you’re not getting at least 4 WiFi “bars” or you are experiencing pauses or low resolution video, configuring your router may help. For the purposes of this article, we’ll be using an Apple AirPort Extreme WiFi router. Most WiFi routers offer similar configuration capabilities. Refer to the manual or online documentation for information on how to access these settings.
WiFi routers operate at different bands. This is similar to a radio, which has an AM or FM band. The two WiFi bands operate at 2.4 GHz and 5 GHz.
When WiFi first emerged, 2.4 GHz was the only available band. This limited the speed of WiFi and, since this band is used by so many wireless devices (cordless phones, baby monitors) and microwaves, it is full of interference. If you are using the 2.4 GHz band, you can see a drop in signal strength if a nearby neighbor uses their microwave.
The 2.4 GHz band is not useless. Since a 2.4 GHz signal uses shorter waves, it can penetrate walls better than a 5 GHz signal. If your Apple TV 4 and WiFi router are separated by walls, 2.4 GHz may actually be better than 5 GHz. In most cases, Apple TV 4 will use both bands, as part of the 802.11ac wireless standard. This isn’t always ideal and if your WiFi reception is weak or spotty, I recommend trying one or the other, with different channels. After all, you’re WiFi network is competing with interference and the architecture of your home. The default router settings might not be ideal.
Finding the best settings is often a trial and error process. While there are some effective tools to examine wireless transmissions, ultimately this has to work on your Apple TV. Apple TV’s wireless receiver is a black box. It can’t be configured or tuned. We can’t look at the bandwidth or channels it is using. It’s a consumer appliance and not a real computer. At best, we can change the router’s configuration, look at WiFi signal strength and test the network speed.
There is a $2.99 Apple TV app, Wi-Fi Info, that can provide more information about your Apple TV 4’s WiFi connection. It provides details such as bands and channels used. This may be a worthwhile investment, however, we’ll troubleshoot Apple TV WiFi without paid apps in this article.
Before we begin, it’s a good idea to download the Speedtest app for Apple TV. This free app is indispensable for diagnosing network issues. It runs a test of your Internet connection speed. Keep in mind, this isn’t necessarily the speed of your WiFi network, but it is still an important statistic. After all, you will be watching streaming video through the Internet and probably not from your home network, although that is a possibility with iTunes Home Sharing, Plex and other technologies.
There’s a 99 cent Apple TV app (WiFi Speed Test) that can measure the data transfer speed between an iOS device and your Apple TV. This is a more accurate measure of your WiFi network’s speed. For the purposes of this article, we’ll use Speedtest because it is free and good enough.
You can download Speedtest by launching the App Store and searching for the app. Select and click on the Speedtest icon to go to the app’s detail screen. Click on Get to install the app. Speedtest will be installed on your Home screen.
With Speedtest installed, launch the app from the Home screen. Click the Touchpad to start the test. This will give you an idea of your Apple TV’s WiFi performance. If possible, run Speedtest on another device that has good WiFi reception, such as your iPhone or computer. If your Apple TV is much slower, it’s a good idea to try configuring your router. Since Speedtest measures your overall network speed, including your Internet connection, run this test a few times to make sure you get similar results. The results will vary, but should be consistent enough to evaluate if WiFi router changes are beneficial.
Before we alter your router’s configuration, you’ll need to download a utility to change the settings. Apple’s AirPort Extreme routers offer both iOS and Mac OS X apps for administering your router. For the purposes of this article, we’ll use the AirPort Utility app on an iPhone. If you have another brand of router, check your documentation for information about the utility. Most routers offer a web-based utility which is served directly from the router.
If you don’t have the AirPort Utility installed on your iPhone, go to the App Store and search for “AirPort Utility”. Tap on “get” to install the app.
Before we start changing settings, it’s a good idea to check if there are any firmware updates for your router. These aren’t released often, but they may fix defects that slow down your network.
Launch the AirPort Utility app and tap on the AirPort Extreme router icon.

A screen with basic information about your router will appear.

Tap on Enter Password and type in the admin password for your AirPort Extreme router, then tap OK.

You’ll see a screen with more specific information, including your IP address and firmware version of your router. Tap on Version to check for firmware updates.

Follow the on-screen instructions to update your AirPort Extreme’s firmware if there’s an update. Your router will restart after the firmware is installed. Try running Speedtest again to see if there is any improvement.
The next step in router configuration is to split the 2.4 GHz and 5 GHz bands into two separate networks. This will prevent Apple TV from connecting to both bands at the same time. Usually, you want Apple TV to connect to both bands, but this can sometimes be part of the problem. It’s possible that a specific band and channel can offer better performance.
Launch the AirPort Utility and enter your password. You will see a screen with basic information about your router. Tap on the “Edit” button on the top right.

A screen with configuration options appears. Tap on Advanced and then Wi-Fi Settings.


Next, tap on 5GHz name and enter a name for your 5GHz network and tap Done on the top right.

Continue tapping Done on the top right until you see a message about updating the router settings. Tap Update to update your router. Your AirPort Extreme router will update and restart.
Your router can’t be used until the orange dot next to the router icon turns green. Once it is green, go to Settings > Network on your Apple TV and connect to the 5 GHz network you just created. Run Speedtest to check if it made any difference. You can also connect to the 2.4 GHz network and run Speedtest again. You should use the fastest WiFi network, however, if it worked better before the change, you may want to delete the 5 GHz network. This will restore the dual band WiFi network. Before you switch back, it may prove useful to try fine tuning each band by selecting different channels.
Channels are similar to radio or TV stations. The WiFi bands are like AM, FM, UHF and VHF. Within each band, the channels provide finer tuning of the WiFi frequency. As previously mentioned, the frequency matters when it comes to interference and home architecture. 2.4 GHz can penetrate walls better than 5 GHz, but is subject to more interference from microwaves and wireless devices. 5 GHz, with its higher frequency, can provide faster WiFi speeds, unless walls, furniture or other physical barriers are blocking the signal.
You can use channels to fine tune the best frequencies and overcome physical barriers. For example, channel 11 on the 2.4 GHz band is good at penetrating walls and is also a little faster than channel 1, because it runs at a higher frequency. Channel 36 is the lowest channel on the 5 GHz band. It’s your best shot at penetrating walls on the 5 GHz band. I set my router to channel 33 on the 5 GHz band, as it is fast and still able to penetrate one interior wall between my router an Apple TV. If your router and Apple TV are separated by many walls or are on different floors, 2.4 GHz may be the best option.
Selecting different channels is a complicated and time-consuming endeavor. There are no silver bullets, but some guidelines may help. The most important aspect of channels is interference. If you live in close proximity to neighbors who are using channel 36 on their 5 GHz network, this may interfere with your WiFi network with identical settings. You want to find a channel that isn’t used by anyone in your proximity. The automatic channel settings on AirPort Extreme and most routers don’t do a great job of this.
Some WiFi connection utilities provide information on the bands and channels used by nearby WiFi hotspots. There are some WiFi network inspection tools that can also provide this information. If you own a Mac and use its built-in WiFi, it comes with a tool that can display the bands and channels used by nearby WiFi devices. This may seem like the best approach, however, WiFi bands and channels change constantly. This is because most people use the automatic channels on their router. There really is no scientific approach to this. It’s trial and error. With that in mind, let’s take a look at how to change WiFi channels.
First, launch the AirPort utility and tap on the AirPort Extreme router icon. Tap on Enter Password, enter your password and tap OK. Tap Edit on the top right of the screen. Tap on Advanced and then Wi-Fi Settings. Tap on Radio Channel. You will see the Radio Channel detail screen. Switch off Automatic Channel on both bands. Now tap on 5 GHz Channel or 2.4 GHz channel to display the channel selector. Tap on a channel from the list. After you have selected a new channel, tap on the back button on the top left. Now tap Done on the top right four times until you see the Update Settings dialog box. Tap Update and wait for your router to update its settings. You’ll see a green dot next to the AirPort Extreme’s label when it is ready.
Lower channels run at lower frequencies. They are slower but can penetrate walls more effectively. Higher channels operate at higher frequencies. They are faster but can be blocked by physical barriers. I tend to use high channels on the 2.4 GHz band and low channels on the 5 GHz band. Your results may be different based on architecture, device placement and the local population of wireless devices.
Test the connection speed using the Speedtest app on your Apple TV. Repeat the process of changing channels until you find an ideal one.
After a lot of experimentation, the best settings that work for me are:
– dual band network (no distinct 5 GHz network name)
– 5 GHz channel: 36
– 2.4 GHz channel: 11
With these settings, I consistently get 5 “bars” of WiFi signal on my Apple TV. I live in a building with 50 units and other residential buildings nearby. There’s a lot of interference. These settings seem to work best.
It’s important not to over think band and channel configuration. There’s only so much bandwidth your Apple TV needs. If you are getting over 5 Mbps, it should be sufficient for streaming HD video. Since Apple TV does not support 4K video, it’s not necessary to have an extremely fast connection. In fact, service providers are often the bottleneck.
I recently upgraded my Internet service and get much faster speeds. Downloading apps and resource bundles is still very slow. Sometimes streaming media is jerky, especially during peak hours. When I run Speedtest, I may be getting over 20 Mbps speeds. The jerky video and slow app downloads are due to overwhelming demands on the content provider’s servers. There’s nothing I can do about it. I can only hope these services get better at capacity planning and scale up their infrastructure to meet peak demand.
Is Someone Stealing Your WiFi?
WiFi security has improved over the years, but it’s still possible for someone to steal your bandwidth. Hackers have the ability to sniff out and decrypt WiFi passwords. Sometimes they can just use a brute force dictionary attack to guess the password. Carless WiFi owners will often use obvious passwords or the defaults provided by the vendor. Even if your network is secured with the best encryption and strongest password, it’s still a good idea to check for intruders.
WiFi Guard is a free Apple TV (tvOS) app that provides information about devices connected to your WiFi network. Simply install the app from the App Store and launch it to view connected devices. Use the Touchpad to select and click on devices for more information. If you see a device that isn’t yours, chances are someone is stealing your WiFi. This will result in slower connection speed. If this is the case, change the WiFi password on your router and consider upgrading the security, if possible. It’s a good idea to run this test periodically, just in case the freeloader continues to steal your WiFi password.
Boost WiFi Signal With A WiFi Network Extender
WiFi network extenders boost the signal of your router and WiFi devices. They basically act as a bridge between your router and WiFi devices that are located farther away. These are essential for large homes or businesses. Apple’s AirPort Express is a popular and inexpensive WiFi network extender. It even comes with an audio output, which can be used to run remote speakers using AirPlay technology.
There are many other brands of WiFi extenders. While they can often give new life to an older router, WiFi technology has vastly improved over the past few years. The new 802.11ac wireless standard is much faster and provides much more range than its predecessors. Apple TV 4 is compatible with this new standard. If you have a lot of new WiFi devices, it may be time to get a new WiFi router.
Consider Getting a New WiFi Router
If you’ve tried everything in this article, to no avail, it may be time to upgrade your WiFi router. I used the same, old, ubiquitous Linksys WRT54 router for years before replacing it with an Apple AirPort Extreme. The Linksys router was cheap, but it was old, slow, and didn’t work well. I found myself needing to restart it at least once a week. To my surprise, they still sell these, even though I replaced mine almost 10 years ago.
I highly recommend Apple’s AirPort Extreme router. At twice the price of most routers, it’s expensive, but well worth the cost. After almost 10 years of use, mine has never given me a problem. Apple regularly updates the firmware and continues to support the product, even though there are newer and better models available. The newest AirPort Extreme supports 802.11ac and can actively focus a WiFi “beam” directly to your device. This may help improve WiFi reception between walls and floors.
Google recently released the new OnHub WiFi router. It’s getting rave reviews from tech writers and customers. With its simple design and high-speed connectivity, OnHub boasts the ability to share your Internet connection with all of the WiFi devices in your home. The Google On iOS and Android app make it easy to configure the OnHub router. Beyond basic configuration, the Google On app can run speed tests and show who is connected to your network. It’s definitely more advanced than Apple’s AirPort Utility.
Whatever WiFi router you choose, keep in mind that you get what you pay for. That $30 router at the electronics store may seem like a bargain. The marketing copy on the package makes it seem like it is the best WiFi router money can buy. It may be adequate, but many of these devices are buggy and frustrating to use. The vendors stop supporting them after a few years. WiFi is essential to your computing experience. Make this choice carefully, read the reviews and don’t skimp!